Contents
Firstly, it should be pointed out that this is not compulsory in any way. This is entirely optional.
What are we talking about?
SpotWalla is a location tracking and sharing service for individuals. It is widely used within the long distance riding community overseas, especially within the USA, and also has close associations with the Iron Butt Association and their usage of SpotWalla as an official tool within their Iron Butt Rally. Their facebook page is here.
It traditionally ran off SPOT (satellite based) tracking devices. In more recent years, people have developed cellphone apps for both iPhones and Android devices, so you can now use low-cost, cellular based devices to capture and submit your ‘SPOT’ points. SpotWalla is an external service, not offered directly by SPOT. Since it is independent, they decided that they would be open to other types of devices being able to use their services.
What does a SpotWalla track look like?
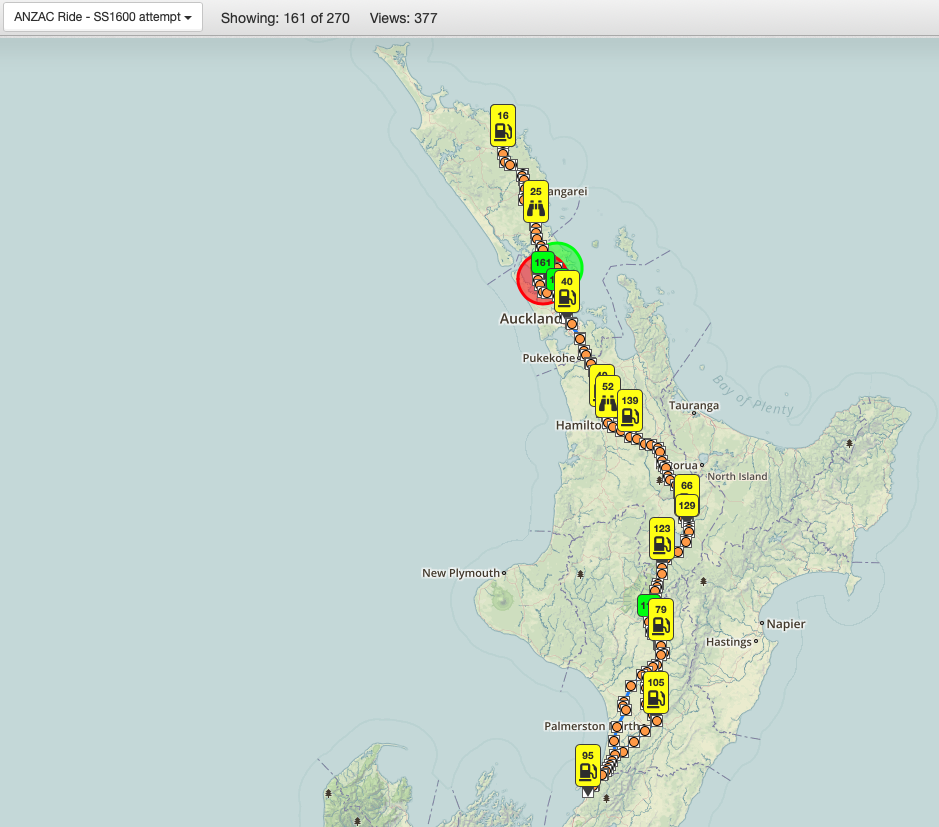
Why do I need to care about this?
Short answer: You don’t. Feel free to scroll on by… 🙂
The purpose of these shared location pages is to allow riders, and the event organisers to see where the group of riders are, to potentially spot problems, people who may have stopped unexpectedly etc. but generally for the hard working event staff to take an interest in what’s going on out there, while it’s actually happening…
And, if you are interested in tracking your rides for your own benefit in future and potentially sharing them, maybe even using your tracked information to prove that you’ve performed a ride along a certain route and within a certain timeframe; then having a SpotWalla trip to show this is highly useful. – Think Iron Butt Association and proving your own, independently organised Saddlesore rides to them…?
Beyond tracking just your own path, your location can contribute to an overview-map which can be useful for our event organisers. – SpotWalla have put together something called ‘Location Pages’ (think ‘event pages’). Which show the last known location for each participant. – That’s what the TT2000 Event team are putting together this year. So they’re asking for willing participants who might want to get involved and try this out.
“Every year at the Finish we at TT HQ receive many questions about how the other riders are progressing and who made it back etc. This year we are considering the use of system to help everyone involved get a really good overview of the event and follow rider’s progress. This systems is used by the Iron Butt Association and uses a location tool called Spotwalla. This will NOT be mandatory and will only happen if enough riders are interested but we would love to be able to provide an event overview similar to what the IBA have in place for their 11-day IBA Rally. Check out this animation!!
Requirements:
- A smart-phone with a working data connection. Either an iPhone or an Android based phone is ideal.
- A phone holder, or a tank bag, so that your phone has a good view of the sky as you ride around.
- An on-bike phone charger, or a battery bank, to allow your phone to remain powered, externally as you ride around. (There’s virtually no way that your phone’s battery will even last a whole afternoon without being plugged into a charger).
- You will need to download an app to your smartphone – there are some paid versions which are inexpensive and worth the upgrades, so please do read that section before doing too much more.
- You will need to setup a SpotWalla account if you don’t already use one.
- You will need to spend a little time getting your SpotWalla account setup to accept your smartphone’s access to their service.
- You will then need to get your smartphone app logged in and associated with your SpotWalla account.
- You will then need to test that your active tracking is working properly and is sending location points into the SpotWalla service.
- Then, you can join the event’s Location page.
Which smart-phone app do I need?
For simplicities sake, we will stick with the two major SpotWalla apps. The choice depends on what type of phone you have.
For apple iPhone users (iOS), visit this link for SWConnect.
For Android phone users, please consider buying the Pro version of Bubbler GPS (it’s US$0.99 in the play store (?NZ$1.50?).
Why should you buy it? Well there are some key features which make this system much more usable; i) buffering of location points when you are out of cell phone signal, and synch when you’re back online and ii) a reduction in the time between tracking points from the minimum of 15 minutes on the free version to 5 minutes on the Pro. Both of these make a massive difference to the usefulness of your tracked route.
So, please, go ahead and click that link on your phone, download the app, and then carry on to the next section.
Creating a SpotWalla account
You will need to sign up for a new account at SpotWalla, these are free. The creator of SpotWalla does not charge for this service, it is run on a donations basis. If you find it useful and if you want to support his efforts, then feel free to make a donation to him. I have in the past, and I will again in the near future. For the sake of completeness, here’s a link to the page from where donations can be made: https://spotwalla.com/help/index.php – And a quick thank you, shout out – to Jason Jonas who does all of this work.
Visit https://spotwalla.com/register.php and register for a new account. Sign up is quick and self-service. Be sure to select the correct timezone when creating your account you’ll want ‘Pacific/Auckland’ – even if you live in Palmerston North!…
Once you’ve created your account you’ll reach a confirmation page with a series of links to click on. You’ll want to make use of those links… In case you skipped this page and need easy access to those links again, the two main ones for us are:
- SWConnect: SWConnect Device
- BubblerGPS: Bubbler GPS Device
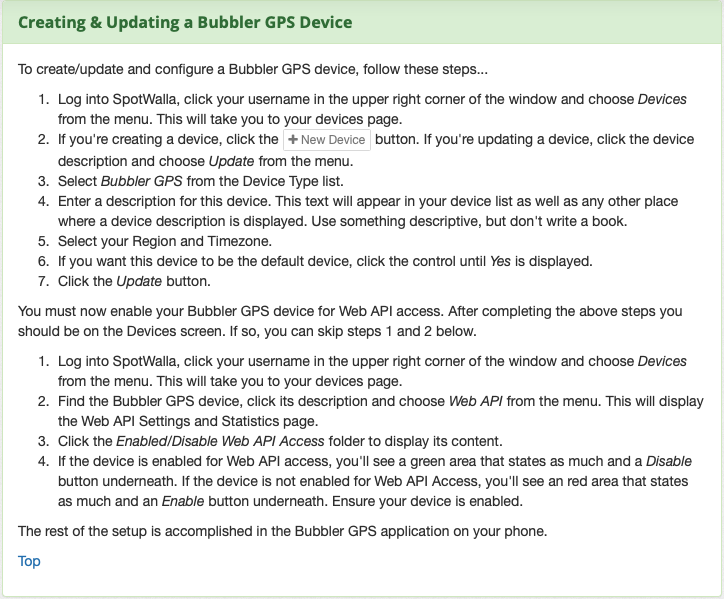
Setting up SpotWalla to accept connections from SWConnect
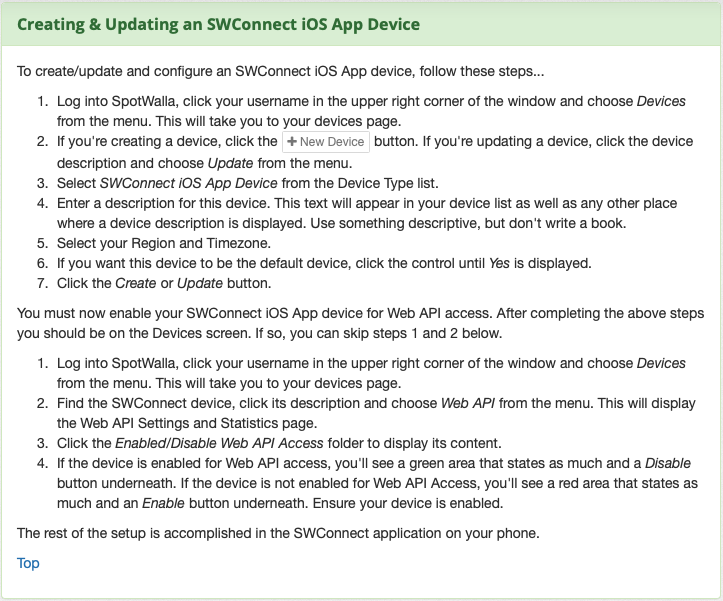
What do these steps look like?
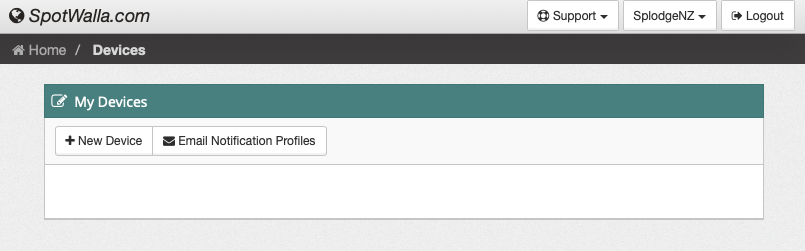
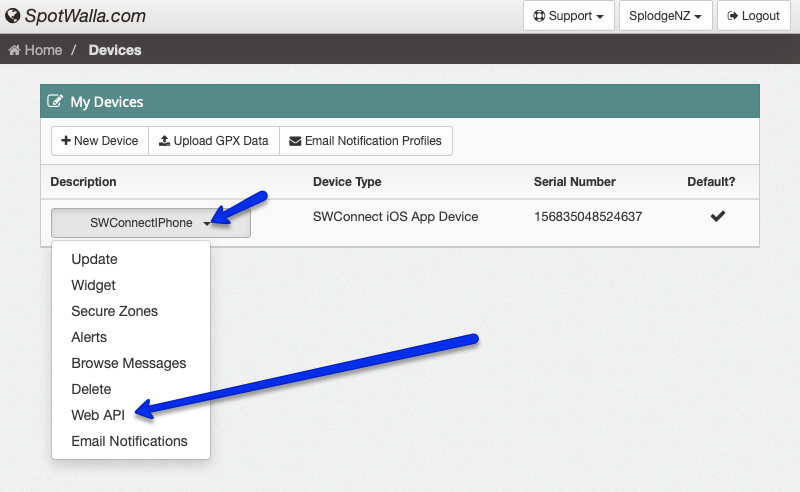
- Devices Page:
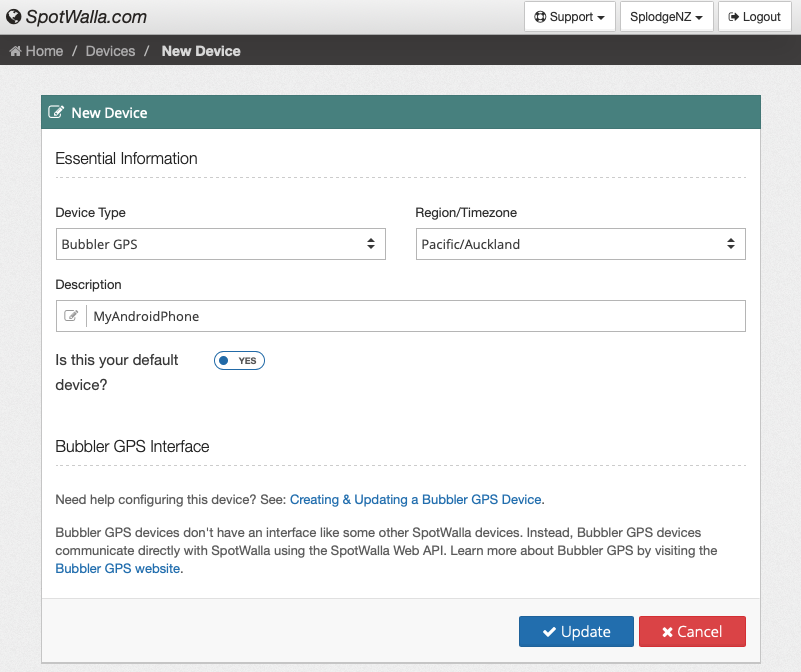
- Adding an iOS / SWConnect device:
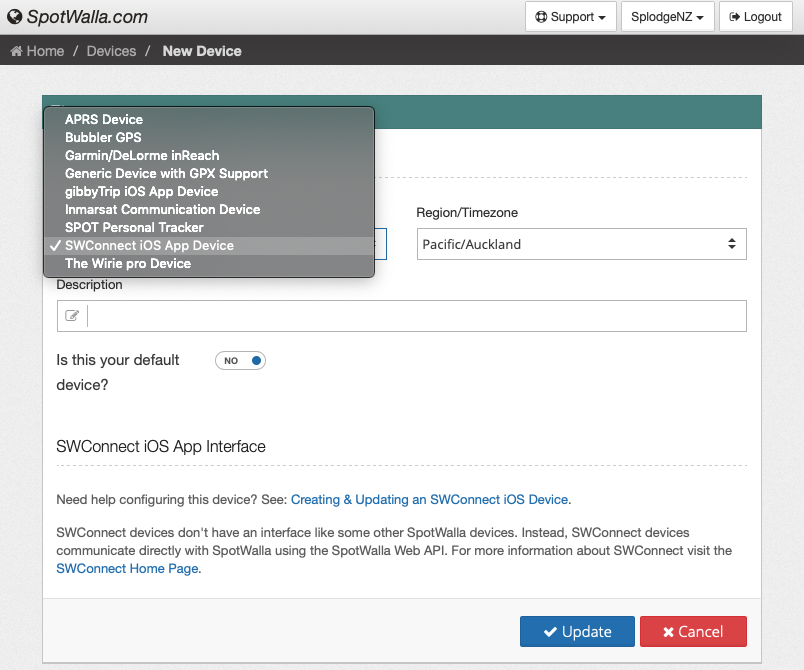
- Changing the default options…
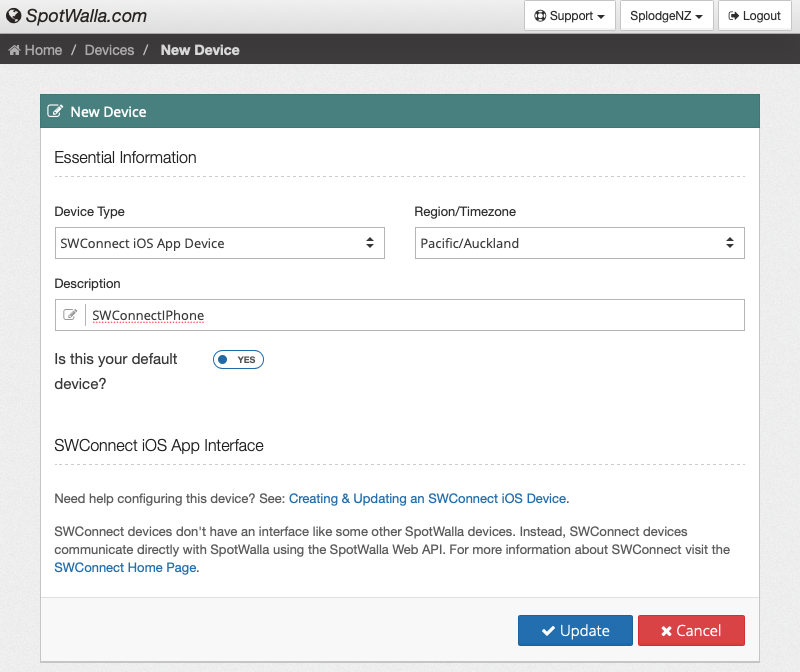
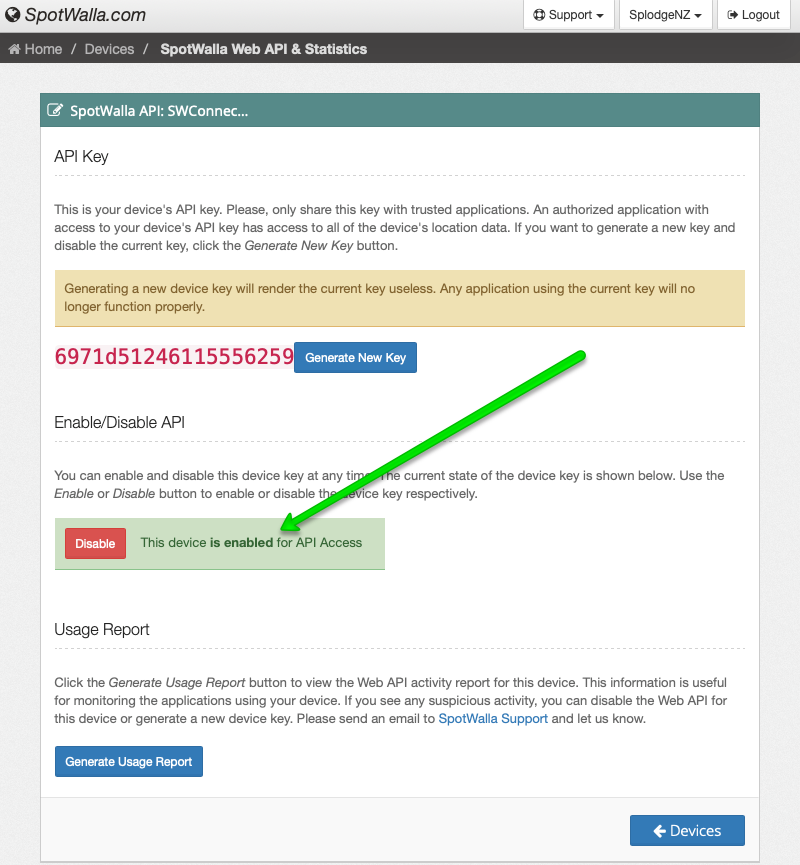
- After hitting upon on the above, we need to enable API access for this device:
- Checking that API access is enabled, you may or may not need to change this, look for the words ‘This device is enabled for API access‘:
At this point you’re done in SpotWalla for now.
You now need to go to your iPhone, fire up the SWConnect app and try to login to SpotWalla from within the app. More details on this below.
Getting SWConnect to talk to SpotWalla (iOS)
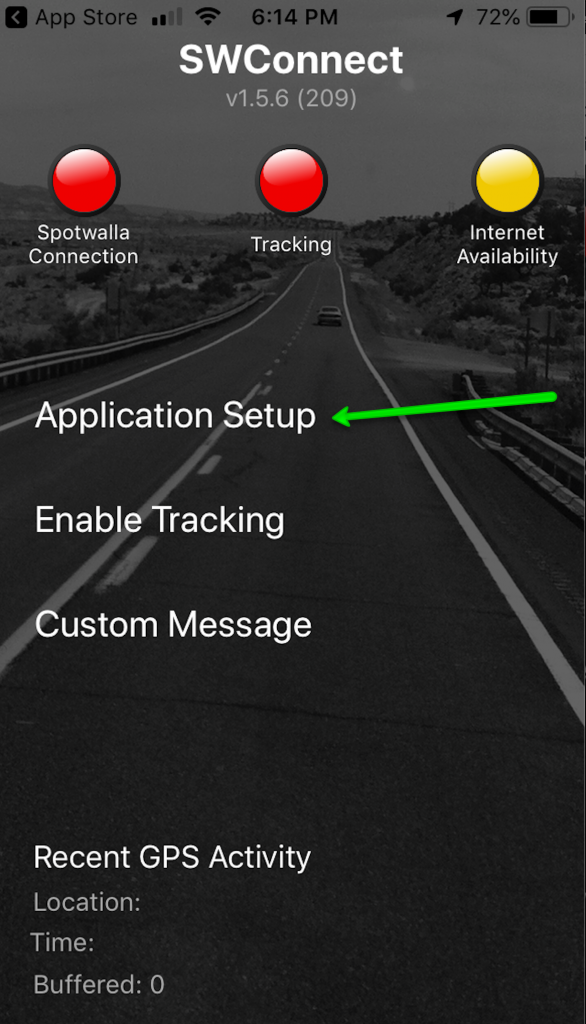
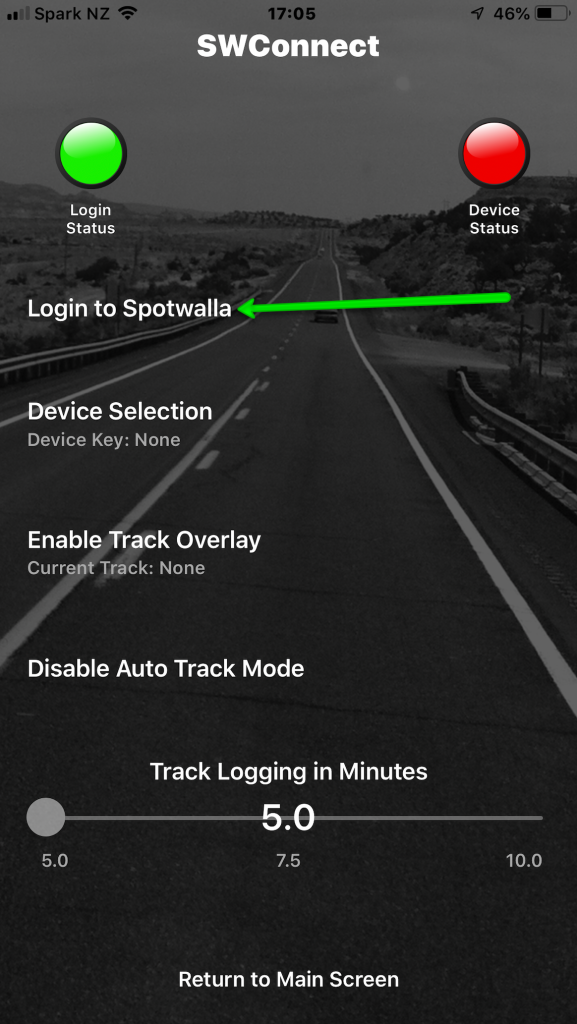
- Open up SWConnect on your phone. Go to the Application Setup area.
- Login to SpotWalla (your login status would likely be showing Red, but mine’s been logged in before..)
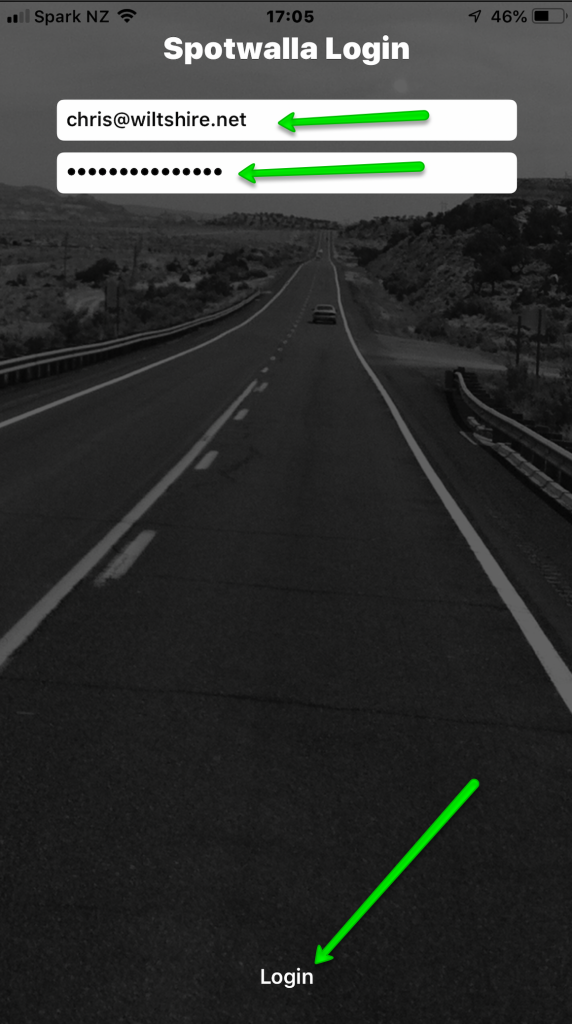
- Enter your own login details here, then click Login at the very bottom of that page.
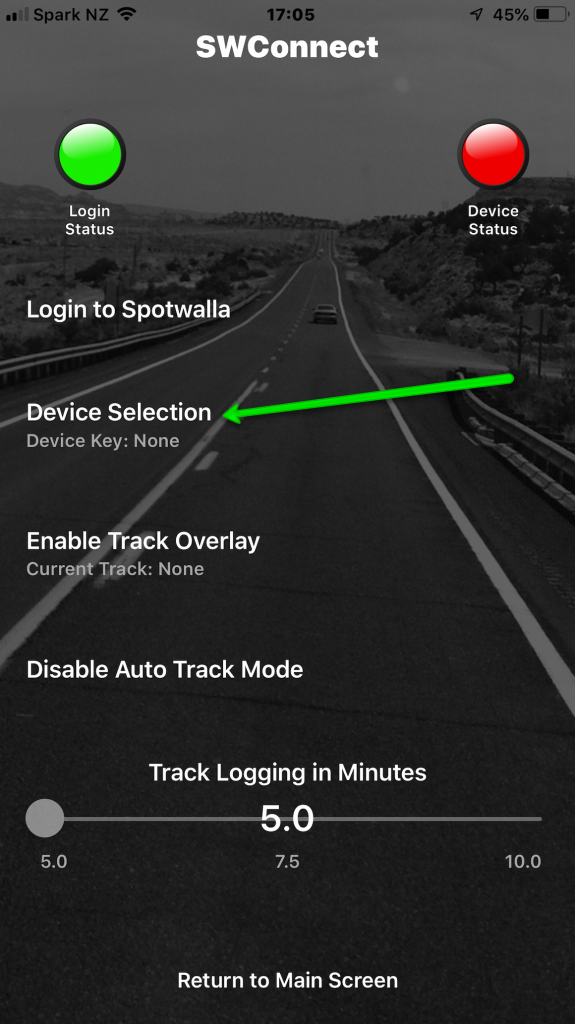
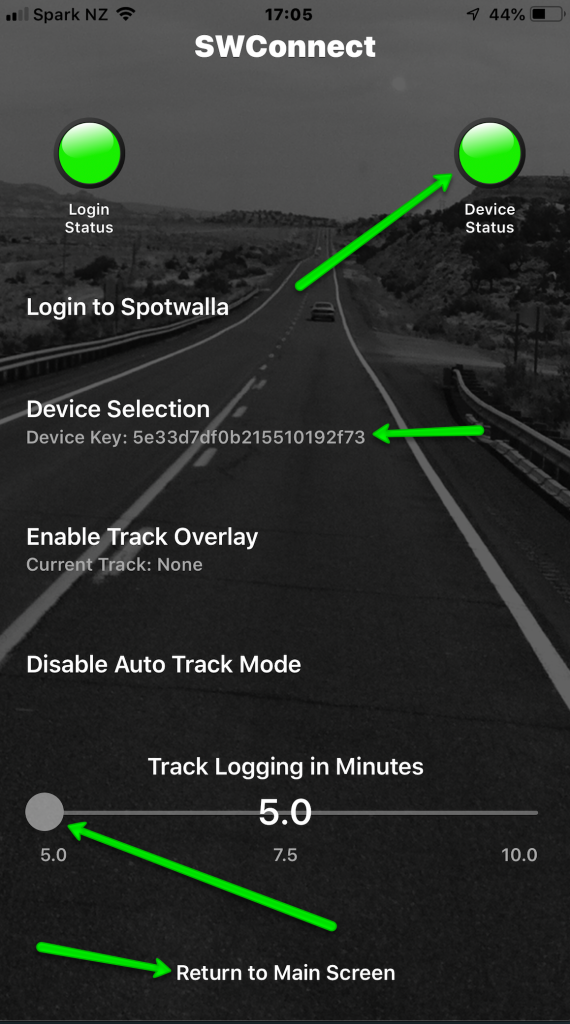
- Now go to the Device Selection area, if it has not already found your device by default, if it has, then skip ahead…
- My setup has a few devices, so I have to chose the one I want to use.
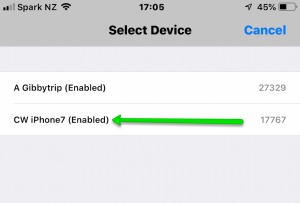
- Now I can see a green login and green device status. I can also see the device’s key in this page too. – At the bottom of this page, I can reduce the time between tracking points to 5 minutes. – This is important, please do this too…
- All is looking good… So return back to the main screen.
- On the main screen, we can see the SpotWalla Connection is all green now, but the Tracking is not active. (Red) – To start tracking, use the ‘Enable Tracking’ textual link.
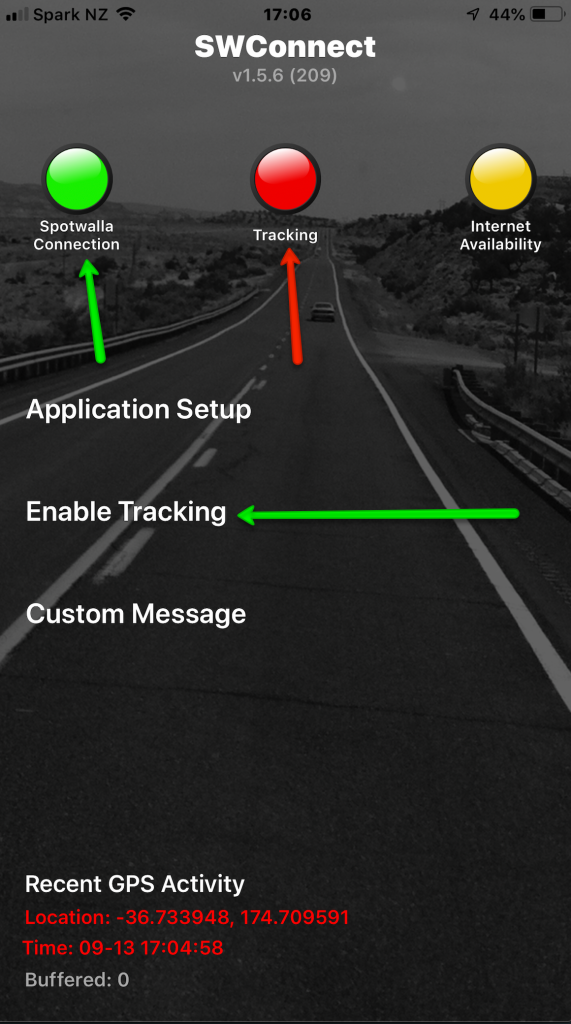
- When it is actively tracking the Tracking icon shows as green. To check that it’s managing to send the tracking points into your SpotWalla account, look to the ‘Buffered Points’ count, if this remains at zero, then it is not having to store them locally on your phone, it’s able to send those points up to the SpotWalla service. – This is all looking good from here.

Setting up SpotWalla to accept connections from BubblerGPS (Android)
What do these steps look like?
- Have a look throug the iphone section above, the SpotWalla steps are pretty much identical for both iphone and android, here’s the ‘Add BubblerGPS Device’ page, with the sections filled in, and the ‘default device’ option set to Yes:
- The rest of the SpotWalla based steps are identical to the iPhone section, check that API access is enabled for your newly listed device.
Getting BubblerGPS setup to run on your Android phone
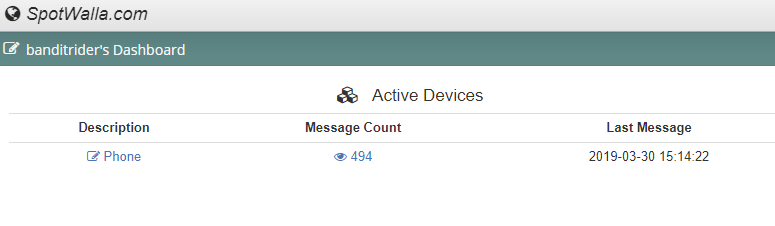
The following screen shots were kindly provided by Andrew Thomson, aka Bandit Rider, another extremely good looking fella who has exquisite taste in motorcycles. – Thank you Andrew. Since Andrew is already a SpotWalla user, his screenshots show how things look like when it’s all, already been setup. – So you’re aiming for yours to look like this too.
- Firstly, note that his ‘device’ in SpotWalla is called just ‘Phone’:
- Assuming you have accessed the Google Play Store and downloaded a paid version of BubblerGPS, then the following screen shots should look similar to yours, remember that these screenshots show how it all looks when it’s setup and working.
- BubblerGPS: please consider buying the Pro version of Bubbler GPS (it’s US$0.99 in the play store (?NZ$1.50?) [@Jan2021].
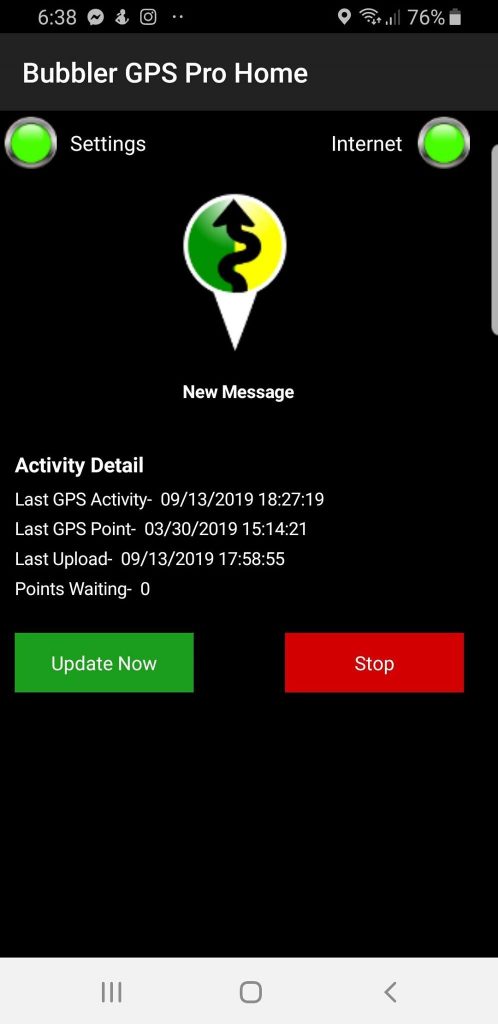
- Start the app, press the Settings button…
- Press the SpotWalla Login button.

- On this page enter your SpotWalla login details, your email address and password, save them and return to the Settings page.

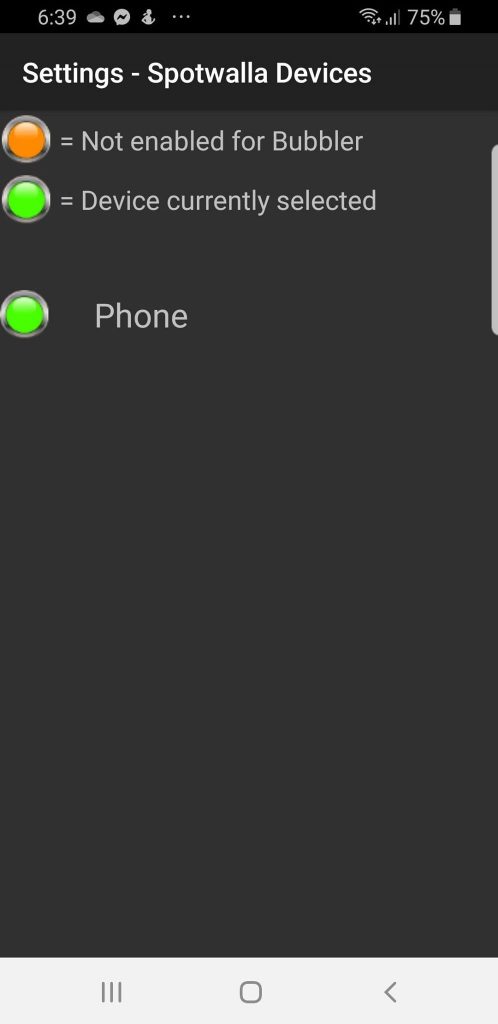
- Visit the SpotWalla Device page. The first two icons on this page are just a ‘key’. Your device name should be shown in the bottom section of this page, if you need to select it, then please do. Andrew’s device is called ‘Phone’, and he has already selected it.
- When you return to the Settings page, not click on the Update Frequency button and change this to the most frequent setting possible, in the paid version of BubblerGPS, this is 5 minutes. – This is highly recommended.
- So, when you’re all done and it’s all working, you should see two green status icons on the top, and you can ‘Start’ tracking using the button at the bottom right.
- If you want to ‘force a point to be pushed’, you can use the ‘Update Now’ button to create a location message.
- To check to see if it’s managing to send its messages, ensure that the ‘Points Waiting’ count does not continue to show a positive count of messages for any length of time.
Important power settings for Android users
During the 2019 NZDR NI events we saw that some of the Bubbler users’ location messages stopped being sent in and they never recovered. It looked initially like it might have been a cellphone signal issue, but this happened to Bubbler users who had bought the Pro version which was supposed to store and forward track points. It didn’t happen to all of the users, just some.
Since then Gary Polwart has been in touch with some of his findings (thanks Gary), and these appear to be super-important for Android users to ensure uninterrupted use of Bubbler.
This was found online:
“When Battery Saver is enabled, Android will decrease your device’s performance to save battery power, so it’ll perform a bit less quickly but will stay running longer. Your phone or tablet won’t vibrate as much. Location services will also be restricted, so apps won’t use your device’s GPS hardware. This means Google Maps navigation also won’t function. Most background data usage will also be restricted. Email, messaging, and other types of app that rely on receiving new data may not update until you open them.”
Your Power Mode settings! – Using ‘Power Mode’ could cause you issues. You need to check these settings to ensure that your base OS is not set to apply power saving steps while you’re trying to track your ride, this can act aggressively and turn off apps which actually need to be allowed to run in the background.
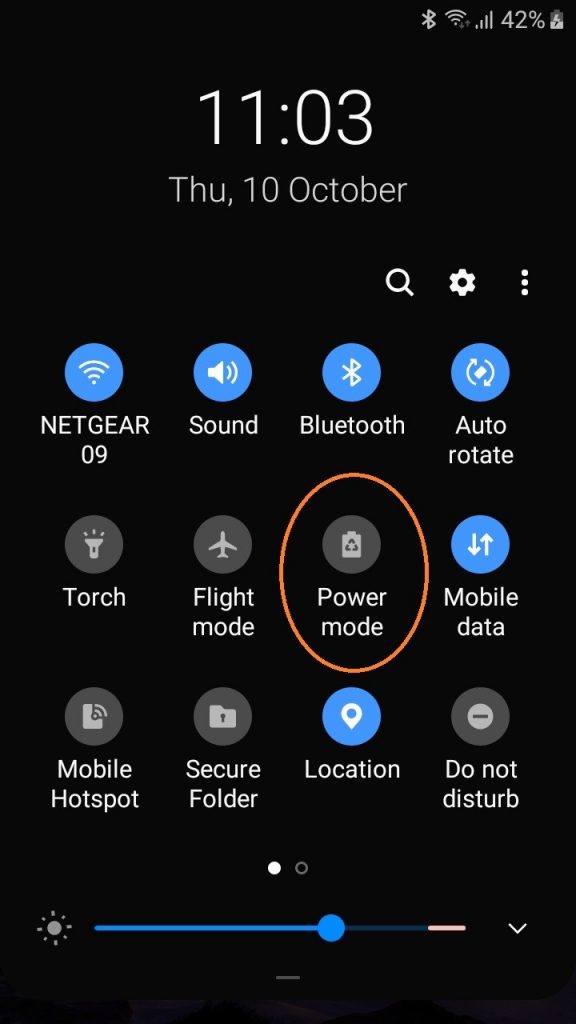
Here’s how to check:
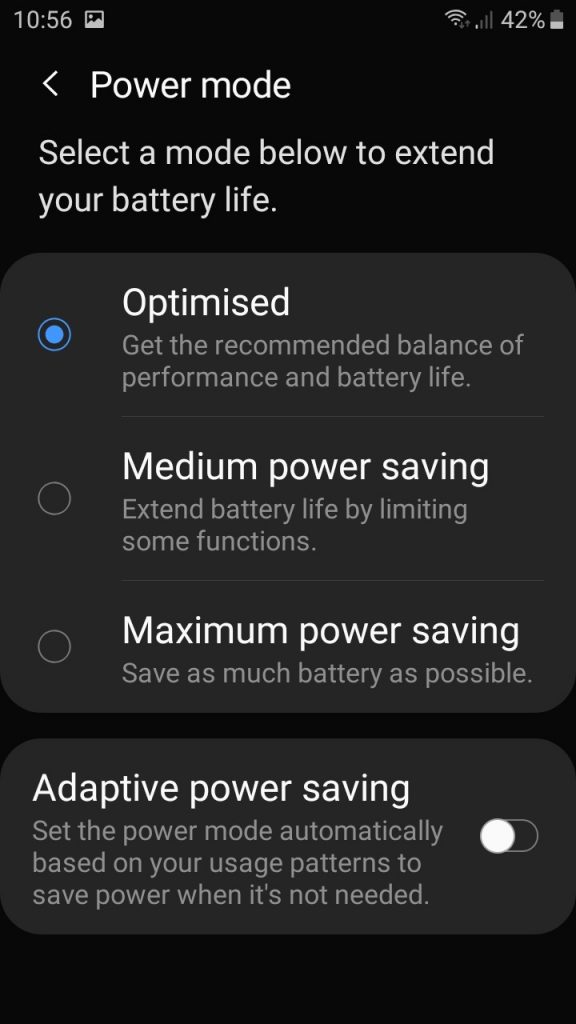
- Go into your settings section and ideally turn OFF the Power mode, (make sure this icon is NOT showing in its highlighted colour):
- If you MUST have it on, then there are some further settings which you will want to try to avoid…:

Having it set to Maximum Power Savings is almost certainly going to cause issues, even if you have your phone plugged in!
If you have it set to Medium, then you may still experience problems… In the page beneath the ‘Medium’ setting is this:
- These settings may cause you problems:
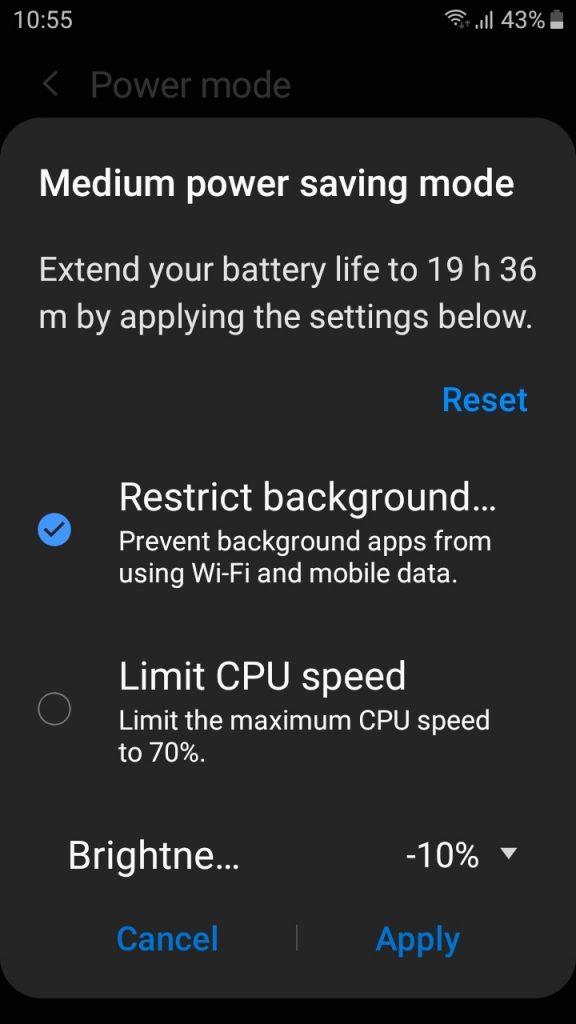
If you restrict background running from using Wifi and mobile data, there is a small chance that it might also prevent it from using GPS inputs too. – I don’t recommend doing this while you’re trying to track your ride…
- If you insist on having Power Mode turned on, then we think you’re best to select the alternative power saving mode ‘Optimised’:
It’s been discovered that having any of these Power Mode settings active, will apply that behaviour EVEN IF YOU’RE CHARGING your phone, they are best avoided entirely if you are running a phone charger on-board your bike.
Ensure you have your Location Services TURNED ON on your phone.
This might sound dumb, but if you’re in the habit of turning Location Services on / off, then ensure that they are ON before you try to use the app to track your location. Sometimes the app itself is not aware that you’ve got Location services blocked, or off in the main OS!!!
Checking that your device messages are getting to SpotWalla
This is the same for any type of device.
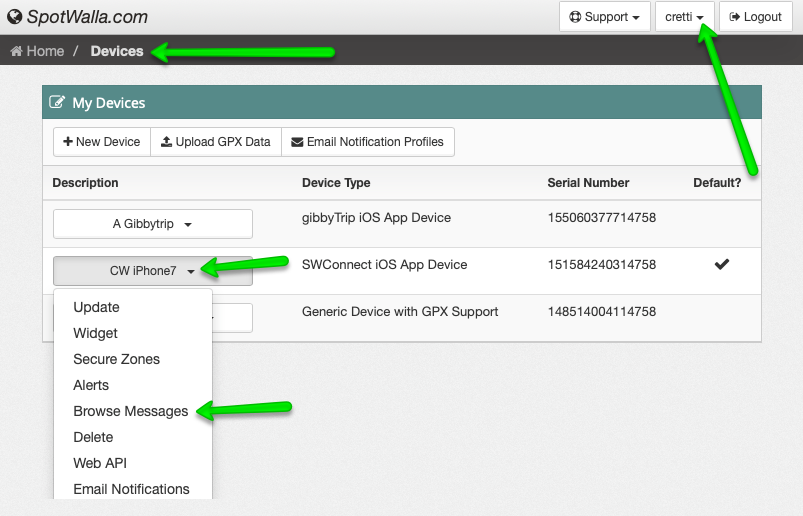
- To confirm that SpotWalla is seing your tracking points, you can return into your SpotWalla account.
- Use the drop down on your username, visit the Devices page.
- Then under your active device, click on Browse Messages:
- In the list of messages, it shows you each individual tracking point which has been recevied from your device, through the API, you’re looking to ensure that you have messages, that they are recently received, and that the time/date / timezone for these messages is correct (I’m happy with what I’m seeing below):
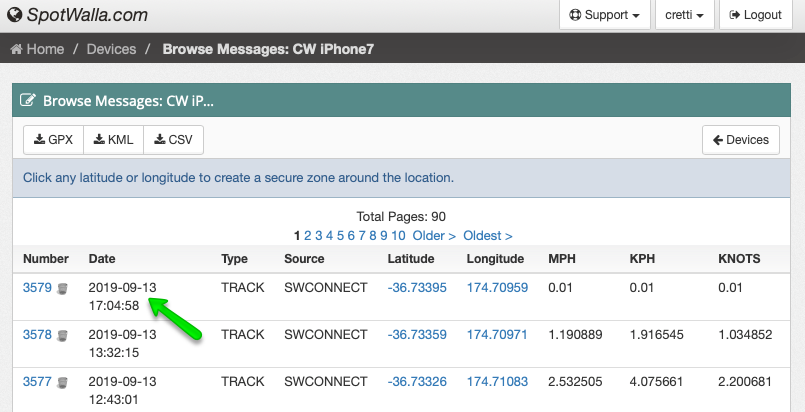
So, we have a working setup on the smart phone, you can continnue through the ‘Joining the Location page’ section…
Joining the Location page
Well done for getting this far. This is where others who have already been using SpotWalla will be joining in. 🙂
We have a location page setup through SpotWalla. You can join the Location page whenever you like, you can test it now by pushing your location through to it, and checking the map to see if you show up. Note that if you are on there, your point will remain visible at that same location until it is next updated, and it will be updated whenever you make SpotWalla active.
By joining these pages, you will need to accept that others, who are associated with the event, including other riders, will be able to view your latest location point, from the time that you join the event page, until you either remove yourself from the Location page, or until after the event has finished. These Location pages will be removed after the 15th March 2021, as they won’t serve any further purpose. – We should hopefully have the rider’s animation created by that point.
You will need the link, and you will need the password to join or to view these event pages. I am not publishing the required passwords here. The TT2000 staff will provide them to you in an email update, or you can private message me to request them.
Keeping the circulation of the passwords private is important to prevent unwanted Spot users from joining our page, it’s also important for you not to share the passwords to people who are not involved in the event please, so that the privacy of our riders, including their locations on the day don’t become public knowledge.
The purpose of these shared location pages is to allow riders, and the event organisers to see where the group of riders are, to potentially spot problems, people who may have dropped back etc., but generally for the hard working staff to take an interest in what’s going on out there, while it’s actually happening, and while we’re riding around having all the fun!
Location pages – Links
You’ll need the passwords to use any of the following links… Keep your eyes open for an email from TT2000 staff, to registered riders which will include the relevant password(s).
TT2000 Location page
To view: https://spotwalla.com/locationViewer.php?id=799
To join: https://spotwalla.com/join.php?a=a&id=799
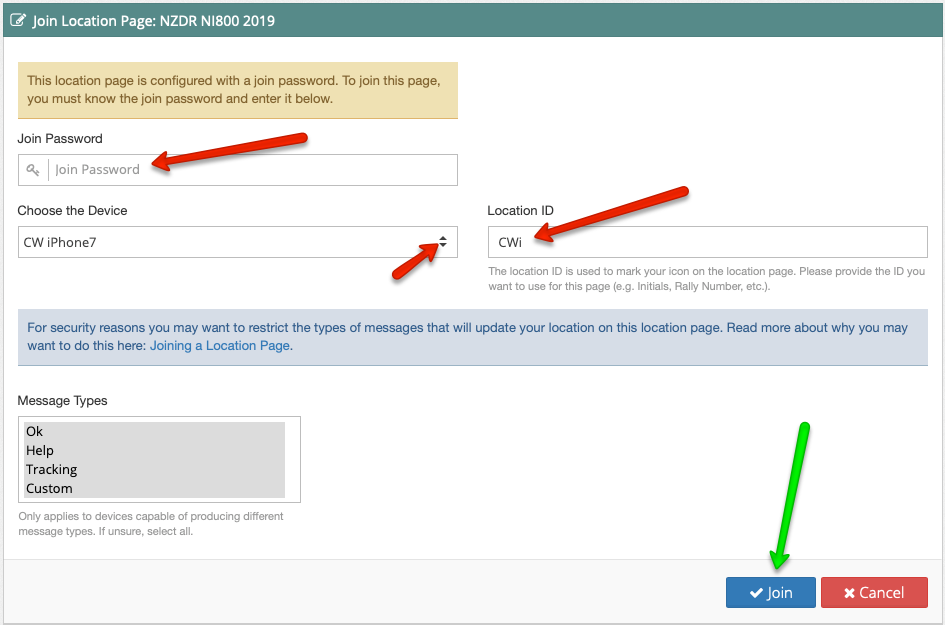
To join this pages, you need a fully working SpotWalla setup – see all of the above post for details. When you’re ready (with the password) click on the relevant join link from the event’s listed above. If you got an email from Wayne which includes a link, then the join-password will be in the link, use that link instead.
When joining, you are asked to enter in a ‘Location ID‘ – This defaults for everyone to ‘???’ – The location ID is used to mark your icon on the location page. – For our map, we’ve decided to use our first initial, then our first two letters of our surname. Mine, (Chris Wiltshire), for example is CWi. This should allow a degree of uniqueness across our riders.
Anyone with the password can view the Location page.
You can send me an email to ask what the password is if you like. I’ll only be providing it to people who are entered, so there may be a short delay while I confirm your entry with the organisers.
Once joined, check your presence on the map
TT2000 Location page
To view: https://spotwalla.com/locationViewer.php?id=799
Once you have joined the Location page, use the view links above to see the map view showing where we all are. You won’t be able to see yourself until you have pushed at least one location message into SpotWalla. To do this, just make sure that your phone app is running, and that you’ve activated the tracking.
No location points showing… – this may be caused by Secure Zones.
I’ve seen a new installation where the location wasn’t visible on the Location page, and it was down to ‘Secure Zones’ being active for the device…
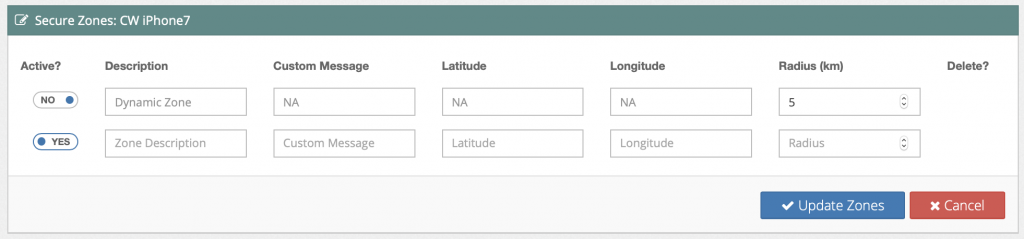
Logged into SpotWall, find your device in the Devices section, click on the little downward arrow on the device’s name and find the ‘Secure Zones’ option.
Ideally you would have your ‘Dynamic Zone’ inactive. – Otherwise it won’t share your current location until you’re at least 5km away from the point which you’ve just dropped… Also, if you have defined any other zones, make sure that they’re not impacting your currently contributed point(s).
Below is what my ‘Secure Zones’ setup looks like for my iPhone:
If you want to check if your location messages are being treated as ‘Secure Zone’ messages, and are being blocked from being shared – then do into the ‘Browse Messages’ page under your contributing device. – If the background of the recent messages are showing with a pinkish / red background, then they’re being with-held and you will need to modify your Secure Zone settings to allow them through…
Changing your Location ID, or removing yourself from an incorrectly joined Location page
If you forgot to change your Location ID from the default ‘???’, then don’t worry, you are not alone. 🙂 – If you are struggling to find where to go to edit this, then again, you are not alone… The place to Edit, or even Remove yourself from a Location page are in the same (not too obvious to find) spot…
First, make sure you’re logged in, you need to be able to see your SpotWalla username on the top right of the screen.
Then, look towards the bottom of the main dashboard area, you’ll see a section being pointed out here titled ‘Active and Future Location Pages’. Expand this section.
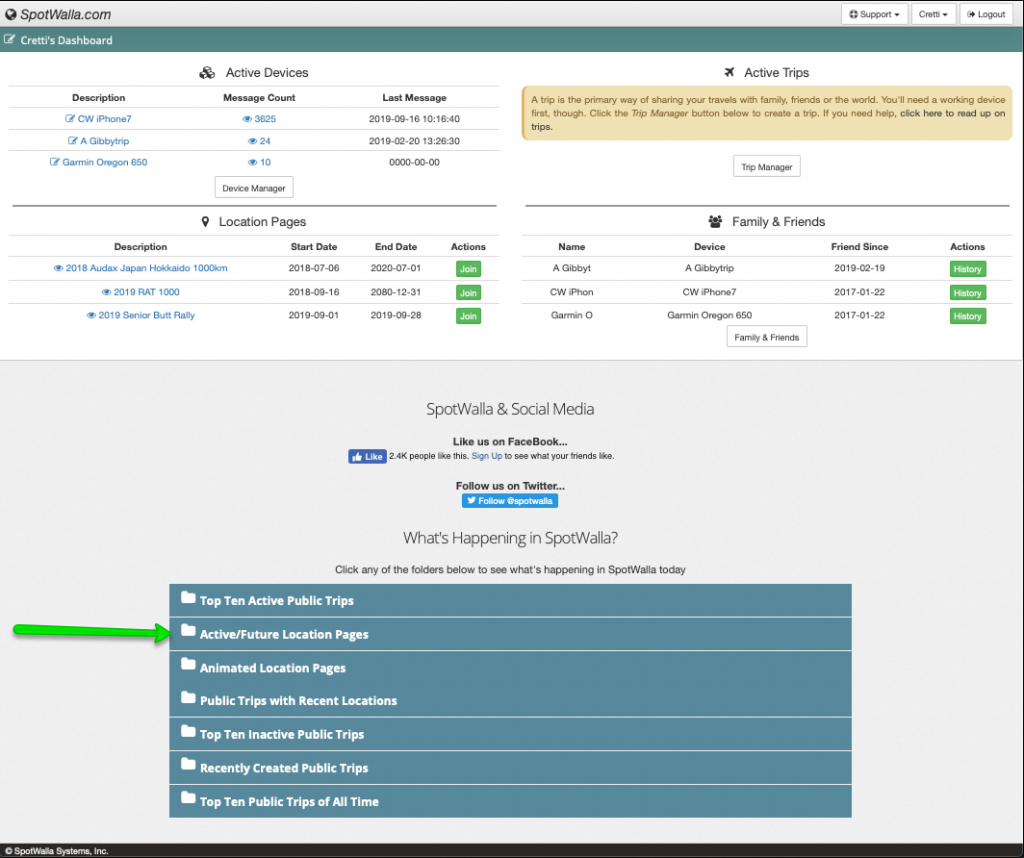
It will expand to a long list of Location pages, they are alphabetically organised. IF YOU ARE LOGGED IN, then you will see the ‘Add Me’, ‘Edit’, ‘Remove’ options on the right hand side of this list.
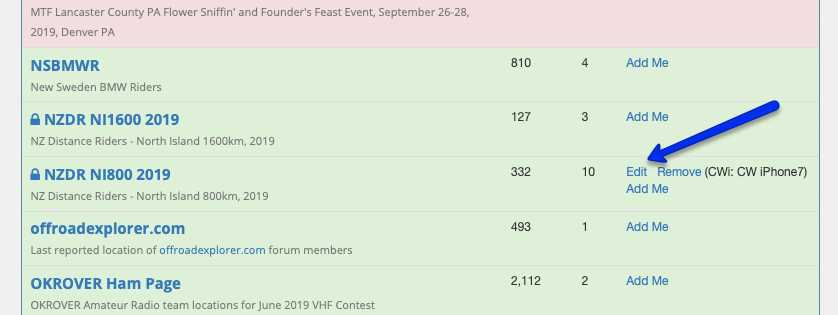
To change your Location ID, which you signed up with, use the Edit button. – You may well need to supply the Join password again in order for those changes to stick.
If you have a problem Editing your details, then try Removing yourself and Adding yourself in again.